Scan to Network Folder not working on Mac: How to Fix
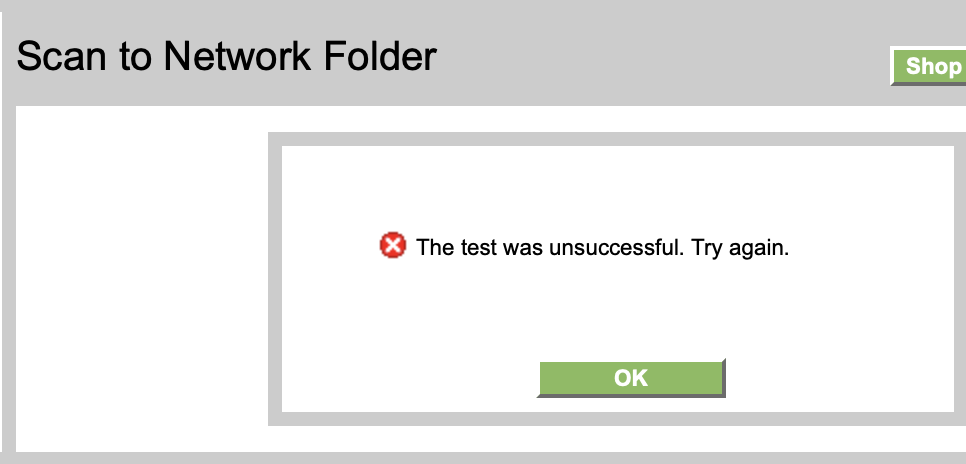
In this guide, we will show you various methods to fix the issue of the Scan to Network Folder not working on Mac. After setting up the network folder, you can then scan documents from your printer to that folder wirelessly. However, according to various user reports, their printer does see that shared folder, but it can’t connect to it. The accompanying error message is “The test was unsuccessful. Try again.” If you are also facing this problem, then this guide will make you aware of numerous workarounds that should rectify this bug. Follow along.
- Fix Scan to Network Folder not working on Mac FIX 1: Try Account Workarounds FIX 2: Try Network Tweaks FIX 3: Toggle File Sharing FIX 4: Re-Add Shared Folder to File Sharing FIX 5: Grant ACL Permissions
Fix Scan to Network Folder not working on Mac
It is recommended that you try out each of the below-mentioned workarounds and then see which one spells out success. So with that in mind, let’s get started.
FIX 1: Try Account Workarounds
- First off, verify your username and password that you have entered [if you are using your full username, then try using your first name only, all in lowercase, and then check out the results.].
- Next up, make sure that your account has admin privileges as well.
- Likewise, you should have given the read and write permissions to the shared folder.
FIX 2: Try Network Tweaks
- Reverify that you have used the correct IP from System Settings > Network > Wi-Fi > Details.
- Likewise, both your Mac and printer should be connected to the same network.
- The shared folder address should be something along the following lines \IP\Shared_Folder_Name. For example, if your IP is 192.168.80.191, and the shared folder name is HPScans, then the path should be \192.168.80.191\HPScans.
FIX 3: Toggle File Sharing
Next up, you should consider disabling and then re-enabling File Sharing. This will refresh its underlying settings and could rectify the issue that we are currently dealing with. So let’s give it a try using the below-listed steps and check out the results.
- Head over to System Settings > General > Sharing.
- Then go to File Sharing and disable the toggle next to it.
- Now restart your Mac and then re-enable File Sharing
- Check if Scan to Network Folder is working on your Mac.
FIX 4: Re-Add Shared Folder to File Sharing
You should also consider deleting and then re-adding the Shared Folder to the File Sharing functionality to refresh its settings. Here’s how it could be done:
- Head over to System Settings > General > File Sharing.
- Then go to File Sharing Information and remove the Shared Folder.
- Now restart your Mac and re-add the Shared folder there.
- Check if Scan to Network Folder is working on your Mac.
FIX 5: Grant ACL Permissions
For all scans saved from the printer to that folder to be accessible to all users on the network, we will need to change permissions on that folder by adding ACLs. On macOS, there are two types of permissions POSIX and ACL. When setting permissions in System Preferences/Sharing we are only setting POSIX permissions. So you’ll have to set the ACLs permissions as well, as explained below:
- First off, go to Launchpad > Others > Terminal.
- Then type in the below command and hit Enter: chmod +a “group:examplegroup allow list,add_file,search,add_subdirectory,delete_child,readattr,writeattr,readextattr,writeextattr,readsecurity,file_inherit,directory_inherit” /path/to/folder
- The key argument is “directory_inherit” which means all files added to that folder will inherit the permissions of the folder.
- In the example above you can choose “everyone” or “staff” for the group.
- The path will be along the lines of \192.168.xx.xxx\Shared_Folder_Name [replace 192.168.xx.xxx with your IP Address].
- Printer not working on macOS Sonoma: How to Fix
- Fix macOS 14 Sonoma “The Printer is out of paper” error!
- The software for the printer was installed incorrectly on Mac [Fix]
- iPhone Cannot Print: Stuck on Gathering Printer Information [Fixed]

(Cancel Reply)
Δ
Printer not working on macOS Sonoma: How to Fix
In this guide, we will show you various methods to fix the issue of the Printer not working on macOS Sonoma. The fourteenth iteration of the OS from the Cupertino giant has brought a slew of noteworthy goodies to the fore. However, along with that, it also seems to have paved the way for the entrance of a few bugs. In this regard, it has already bugged the users with the false “ The printer is out of paper ” alerts in the past. And now, there is another unwanted entry to this list.
Numerous users have now voiced their concern that the printer is not working along the expected lines on the macOS Sonoma. While sometimes it ends up printing random alphanumeric characters [even if the encoding is correct], other times it just refuses to print in the first place. If you are also getting bugged by these issues, then this guide will make you aware of numerous workarounds to iron them out. Follow along.
- Fix Printer not working on macOS Sonoma FIX 1: Install Printer Update FIX 2: Reinstall Printer FIX 3: Disable Antivirus/Firewall FIX 4: For HP Printers FIX 5: For Lexmark Printers FIX 6: Reset Printer System
Fix Printer not working on macOS Sonoma
It is recommended that you try out each of the below-mentioned workarounds and then see which one spells out success. So with that in mind, let’s get started.
FIX 1: Install Printer Update
- To begin with, go to System Settings > Printers and Scanners.
- Select your printer from the list and hit the minus sign next to it to remove it.
- Then click on Delete Printer in the confirmation dialog box.
- Once done click on the plus icon and select Add Printer or Scanner.
- After that, select the printer type: USB, Wireless, or Ethernet connection.
- Then select your printer under the “Use or Print Using” drop-down list and click on Add.
- Now click on the Apple logo and select App Store.
- Then go to the Updates tab and download and install the available printer update.
- Check if it fixes the Printer not working issue in macOS Sonoma.
FIX 2: Reinstall Printer
Next up, you should consider removing and then re-adding the printers on your Mac. Doing so will refresh its underlying settings and could well rectify the issue that we are currently dealing with. So give it a try using the below given steps ad then check out the results.
- Power off your printers and go to System Settings > Printers and Scanners.
- Select your printer from the list and hit the minus sign next to it to remove it.
- Then click on Delete Printer in the confirmation dialog box.
- Now open Finder and go to Library > Printers. Then delete the folder named after your printer.
- After that, go to Library > Printers> PPD > Contents > Resources and delete the file named after your printer.
- Then go to Library > Cache and delete the folder named after your printer.
- Now restart your Mac and power on the printer.
- Go to your printer’s Download site and grab the latest drivers, corresponding to your product’s model number.
- Then launch the driver setup file and proceed with the on-screen instructions to complete the process.
- Check if it fixes the Printer not working issue in macOS Sonoma.
FIX 3:Disable Antivirus/Firewall
In some instances, a firewall or antivirus might also conflict with the printer. Therefore, you should consider temporarily disabling it using the below-listed instructions and then check out the results.
- Open System Settings and select Network from the left-hand side.
- Then go to Firewall and disable the toggle next to it.
- Check if it fixes the Printer not working issue in macOS Sonoma.
FIX 4: For HP Printers
In case there are any issues with the HP Smart app on your Mac, then its repercussions are bound to be faced by the printer. Therefore, you should consider uninstalling it and removing its data and then reinstalling its fresh instance from scratch. Here’s how it could be done:
- Launch Finder, go to Application, and drag and drop the HP Smart app into the trash.
- Then go to the Users/Username/Library/Application Support folder and delete the files from there, if any.
- Now download and install the latest version of the HP Smart app from the App Store.
- Check if it fixes the Printer not working issue in macOS Sonoma.
FIX 5: ForLexmark Printers
When installing the Lexmark drivers, then instead of selecting the Lexmark driver, you should select AirPrint and then check if it works out in your favor. [Verify from here whether your printer supports AirLink or not]
FIX 6: Reset Printer System
If none of the aforementioned methods managed to spell out success, then your last course of action should be to reset the printer settings back to their factory default state. Here’s how it could be done:
- To begin with, go to System Settings > Printers and Scanners.
- Then right-click the blank space in the Printers list and select “Reset printing system”.
- After that, click on Reset in the confirmation dialog box.
- Wait for the process to complete [until there are no printers on the list].
- Once done, restart your Mac and go to System Preferences > Printers and scanners.
- Then click on the plus icon, select your printer from the list and click Add.
- Now click “Print Using…” and then select your printer from the list. That’s it.
- How to Show 24 Hour Time on Lock Screen in Mac Sonoma
- Mac Sonoma not going to Deep Sleep: How to Fix
- Incorrect Time in macOS Sonoma: How to Fix
- Aerial Wallpapers Location in macOS Sonoma
(Cancel Reply)
Δ
Fix macOS 14 Sonoma “The Printer is out of paper” error!
In this guide, we will show you various methods to fix “The Printer is out of paper” error in macOS 14 Sonoma. The Cupertino giant has just rolled out the fourteenth iteration of the OS. This time around, there are a few intriguing features and UI teaks to look forward to. Some of the noteworthy ones encompass the likes of Screen Savers, Widgets, Video Conferencing, Safari, Messages, Privacy, and Accessibility settings.
On the flip side though, a few bugs managed to have crept in as well. In this regard, we recently talked about the Ethernet issues plaguing numerous users. And now, there are issues with the printers. A slew of complaints are lined up across numerous forums wherein macOS 14 Sonoma users have voiced their concern that they are getting the “The Printer is out of paper” error message even though that is not the case.
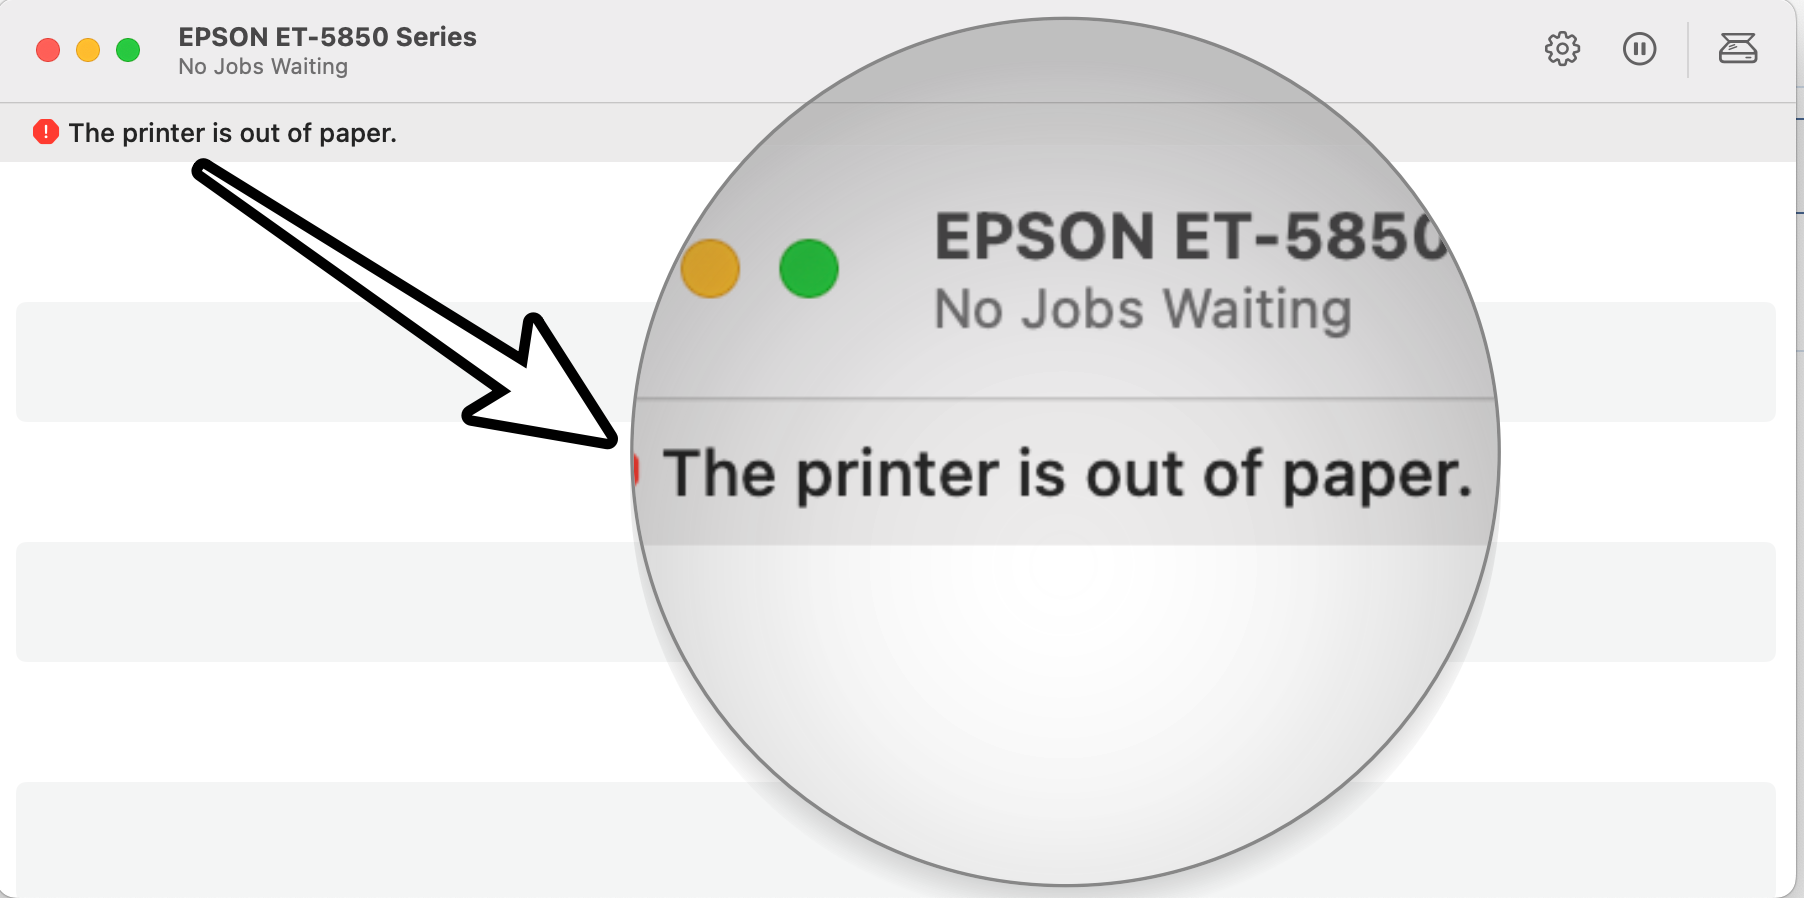
The printer queue window tends to display a red symbol next to the error prompt. Moreover, the issue isn’t limited to any particular printer brand, the likes of EPSON and Ricoh, among others all are part of the affected list. If you are also getting bugged by this issue, then this guide will make you aware of numerous workarounds that could help you rectify it. Follow along.
- Fix macOS 14 Sonoma “The Printer is out of paper” error FIX 1: Try Basic Workarounds FIX 2: Update Printer Drivers FIX 3: Reinstall Printer Drivers FIX 4: Disable Antivirus/Firewall FIX 5: For HP Printers FIX 6: For Lexmark Printers FIX 7: Reset Printer System
Fix macOS 14 Sonoma “The Printer is out of paper” error
It is recommended that you try out each of the below-mentioned workarounds and then see which one spells out success. So with that in mind, let’s get started.
FIX 1: Try Basic Workarounds
First off, you should try out the following three basic workarounds tweaks:
- Restart your Mac: Click on the Apple logo at the top left and select Restart.
- Restart your printer
- Remove the paper as well as the paper tray (if applicable), and reinsert it.
FIX 2: Update Printer Drivers
- To begin with, go to System Settings > Printers and Scanners.
- Select your printer from the list and hit the minus sign next to it to remove it.
- Then click on Delete Printer in the confirmation dialog box.
- Once done click on the plus icon and select Add Printer or Scanner.
- After that, select the printer type: USB, Wireless, or Ethernet connection.
- Then select your printer under the “Use or Print Using” drop-down list and click on Add.
- Now click on the Apple logo and select App Store.
- Then go to the Updates tab and download and install the available printer update.
- Check if it fixes “The Printer is out of paper” error in macOS 14 Sonoma.
FIX 3: Reinstall Printer Drivers
Next up, you should consider removing and then re-adding the printers on your Mac. Doing so will refresh its underlying settings and could well rectify the issue that we are currently dealing with. So give it a try using the below given steps ad then check out the results.
- Power off your printers and go to System Settings > Printers and Scanners.
- Select your printer from the list and hit the minus sign next to it to remove it.
- Then click on Delete Printer in the confirmation dialog box.
- Now open Finder and go to Library > Printers. Then delete the folder named after your printer.
- After that, go to Library > Printers> PPD > Contents > Resources and delete the file named after your printer.
- Then go to Library > Cache and delete the folder named after your printer.
- Now restart your Mac and power on the printer.
- Go to your printer’s Download site and grab the latest drivers, corresponding to your product’s model number.
- Then launch the driver setup file and proceed with the on-screen instructions to complete the process.
- Check if it fixes “The Printer is out of paper” error in macOS 14 Sonoma.
FIX 4:Disable Antivirus/Firewall
In some instances, a firewall or antivirus might also conflict with the printer. Therefore, you should consider temporarily disabling it using the below-listed instructions and then check out the results.
- Open System Settings and select Network from the left-hand side.
- Then go to Firewall and disable the toggle next to it.
- Check if it fixes “The Printer is out of paper” error in macOS 14 Sonoma.
FIX 5: For HP Printers
In case there are any issues with the HP Smart app on your Mac, then its repercussions are bound to be faced by the printer. Therefore, you should consider uninstalling it and removing its data and then reinstalling its fresh instance from scratch. Here’s how it could be done:
- Launch Finder, go to Application, and drag and drop the HP Smart app into the trash.
- Then go to the Users/Username/Library/Application Support folder and delete the files from there, if any.
- Now download and install the latest version of the HP Smart app from the App Store.
- Check if it fixes the “The Printer is out of paper” error in macOS 14 Sonoma.
FIX 6: ForLexmark Printers
When installing the Lexmark drivers, then instead of selecting the Lexmark driver, you should select AirPrint and then check if it works out in your favor. [Verify from here whether your printer supports AirLink or not]
FIX 7: Reset Printer System
If none of the aforementioned methods managed to spell out success, then your last course of action should be to reset the printer settings back to their factory default state. Here’s how it could be done:
- To begin with, go to System Settings > Printers and Scanners.
- Then right-click the blank space in the Printers list and select “Reset printing system”.
- After that, click on Reset in the confirmation dialog box.
- Wait for the process to complete [until there are no printers on the list].
- Once done, restart your Mac and go to System Preferences > Printers and scanners.
- Then click on the plus icon, select your printer from the list, and click Add.
- Now click “Print Using…” and then select your printer from the list. That’s it.
- Click on Desktop Hides All Apps on Mac Sonoma [Fixed]
- Menu Bar Icons missing in macOS Sonoma: How to Fix
- macOS 14 Sonoma: Cannot Backup using Time Machine
- Fix Black Screen Issue on macOS 14 Sonoma
(Cancel Reply)
Δ
The software for the printer was installed incorrectly on Mac [Fix]
Numerous users have recently voiced their concern that they are unable to set up their printers. Whenever they are trying to do so, they are instead greeted with the “software for the printer was installed incorrectly Please reinstall the software from the manufacturer” error message on their Mac. If you are also in the same boat, then this guide will make you aware of a couple of nifty workarounds to effectivity address this bug. Follow along.
- Fix The software for the printer was installed incorrectly on Mac FIX 1: Verify Certificate Date FIX 2: Add Printer via IP Address FIX 3: Manually Place PPD Files FIX 4: Install Unsigned Drivers
Fix The software for the printer was installed incorrectly on Mac
It is recommended that you try out each of the below-mentioned workarounds and then see which one spells out success. So with that in mind, let’s get started.
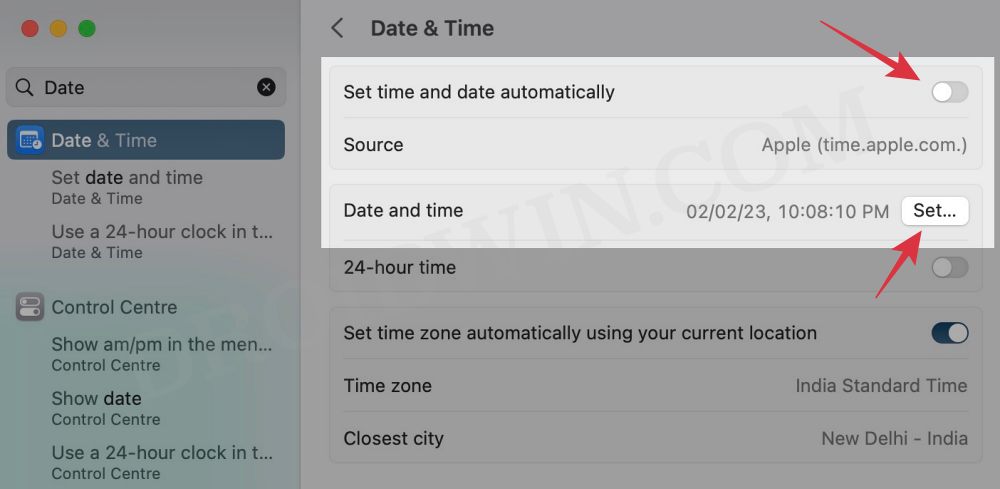
FIX 1: Verify Certificate Date
First off, make sure that the printer’s drivers aren’t expired. If they are, then you should first disconnect your Mac from the internet, change the date on your Mac prior to the expiration date, and then retry the installation. Or if that doesn’t work out, then try out our second fix listed below.
FIX 2: Add Printer via IP Address
If you’re having an expired encryption certificate for your printer and the aforementioned tweak didn’t spell out success, then your next course of action is to install the printer via its IP Address. Here’s how it could be done:
- Open S ystem Settings > Network and select your printer.
- Then note down the IP Address next to your printer.
- Now S ystem Settings and go to Printers and Scanners.
- Then select your printer from the list and delete it.
- After that, click on Add Printer.. and go to the Web tab.
- Then type in the IP Address and it will bring the printer, hit Add.
- Check if it fixes the “software for the printer was installed incorrectly” error on Mac.
FIX 3: Manually Place PPD Files
- The driver package that you have downloaded might also have a few PPD files.
- So copy those PPD files and place them at the following location /Library/Printers/PPDs/Contents/Resources/
- Now check if it fixes the “software for the printer was installed incorrectly” error on Mac.
FIX 4: Install Unsigned Drivers
If you could only get hold of the drivers from unknown developers or they are unsigned but you are ready to take the risk, then here’s how you to install these unsigned drivers.
- Go to Launchpad > Others and select Terminal.
- Then type in the below command in the terminal: sudo spctl –global-disable
- Now try installing the driver and check out the result.
- Printer not working in macOS Ventura: How to Fix
- Printer Error: Stopped Filter failed on Mac [Fixed]
- How to Clear and Rebuild Icon Cache on Mac
- Adobe Illustrator v27 crashing on Mac and Windows [Fixed]
(Cancel Reply)
Δ
iPhone Cannot Print: Stuck on Gathering Printer Information [Fixed]
In this guide, we will show you a nifty workaround that should help you fix the issue of your iPhone being unable to print and instead being stuck on the “Gathering Printer Information” prompt. The devices from the Cupertino giant don’t seem to be having the best of times with printers. After the printer is out of paper error on Mac and AirPrint not working on iPhones, a new printer bug has seemingly made its way.
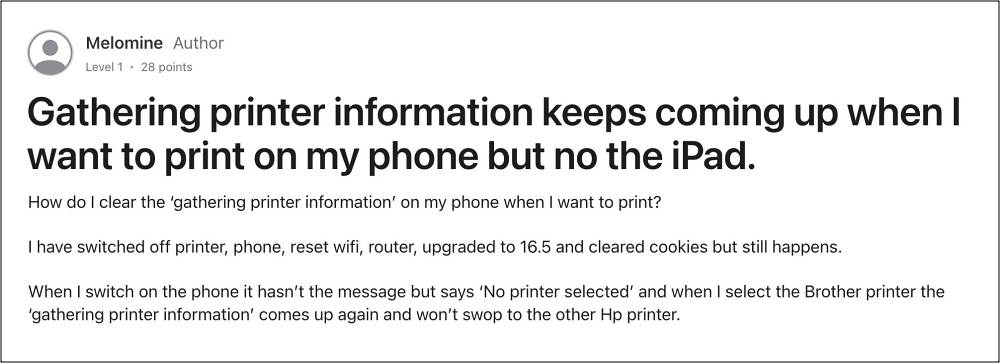
This time around, numerous users have voiced their concern that although their iPhone does show a list of available printers, but when they select it, it brings up the “Gathering Printer Information” prompt, and then they are taken back to the ‘no printers found’ screen. If you are also getting bugged by this issue, then this guide will help you rectify it. Follow along.
Fix iPhone Cannot Print: Stuck on Gathering Printer Information
As strange as it may sound, to rectify this issue, you’ll have to uninstall VPN from your device. Disabling or turning it off will not get the job done, uninstalling the VPN is the only way out. So carry out this tweak using the below-listed steps and check if it fixes the issue of your iPhone being unable to print and instead being stuck on the “Gathering Printer Information” prompt.
- To begin with, head over to Settings > General > VPN.
- Now tap on the info sign next to the VPN > Delete VPN.
- Then go to General > Profile and select the VPN profile.
- Finally, tap on Remove Profile and restart your device.
As far as the official stance on this matter is concerned, the developers have yet to acknowledge this issue, let alone give out any ETA for the rollout of a fix. As and when any of these two things happen, we will update this guide accordingly. In the meantime, the aforementioned workarounds are your best bet.
- AirPrint Printer not working on iOS 17: How to Fix
- Fix macOS 14 Sonoma ‘The Printer is out of paper’ error!
- Printer not working on macOS Sonoma: How to Fix
- Procreate Print not working on iPad: How to Fix
(Cancel Reply)
Δ
