su is not recognized as an external or internal command [Fixed]
In this guide, we will show you various methods to fix the “su is not recognized as an external or internal command” error. ADB Commands are among the most powerhouse tools for tech enthusiasts. Be it for carrying out the basic tasks of booting the device to Recovery or Fastboot Mode or a slightly technical one of installing firmware via ADB Sideload, there are a plethora of tweaks that you could try out.
However, they are also most prone to errors. Among them, it is the SuperUser or SU commands that could prove to be quite a challenging task to successfully execute. In this regard, various users have voiced their concern that they are getting the “su is not recognized as an external or internal command” error. If you are also in the same boat, then this guide will make you aware of numerous methods to rectify it. Follow along.
- Fix su is not recognized as an external or internal command [Fixed] FIX 1: Verify ADB Connection FIX 2: Make Sure Device is Rooted FIX 3: Use Shell Command First FIX 4: Toggle Android Shell SuperUser Prompt
Fix su is not recognized as an external or internal command [Fixed]
It is recommended that you try out each of the below-mentioned workarounds and then see which one spells out success for you. So with that in mind, let’s get started.
FIX 1: Verify ADB Connection
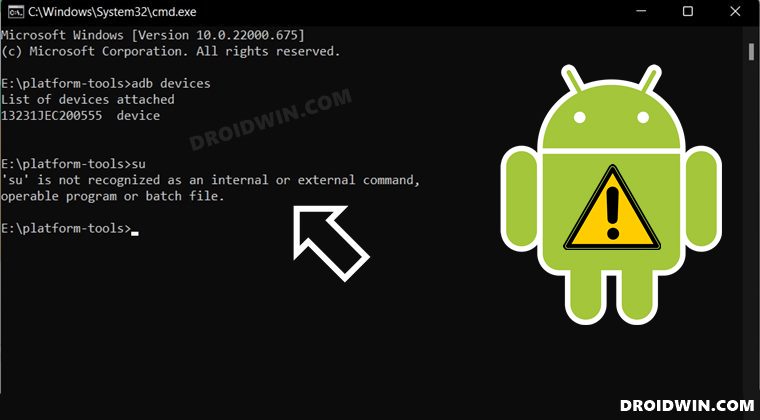
Your first course of action should be to verify that your device has successfully established an ADB connection with your PC. Here’s how it could be done:
- To begin with, download and extract Android SDK Platform Tools on your PC.
- Then enable USB Debugging on your device and connect it to the PC via USB Cable.
- After that, head over to the platform-tools folder, type in CMD, and hit Enter.
- This will launch Command Prompt. Execute the below command in this CMD window: adb devices
- If you get the device ID, then the connection stands successful and you could proceed with the su command.
On the other hand, if you get an unauthorized message or no device ID, then check out our guide on How to Fix All ADB and Fastboot Errors . Try out all the tweaks mentioned in that guide and then retry the su command. You might no longer get the “su is not recognized as an external or internal command” error.
FIX 2: Make Sure Device is Rooted
Since you are executing SuperUser commands, your device needs to be rooted beforehand. If you haven’t done so yet, then refer to our below-listed guides and then retry executing the su command. You should no longer get any errors now.
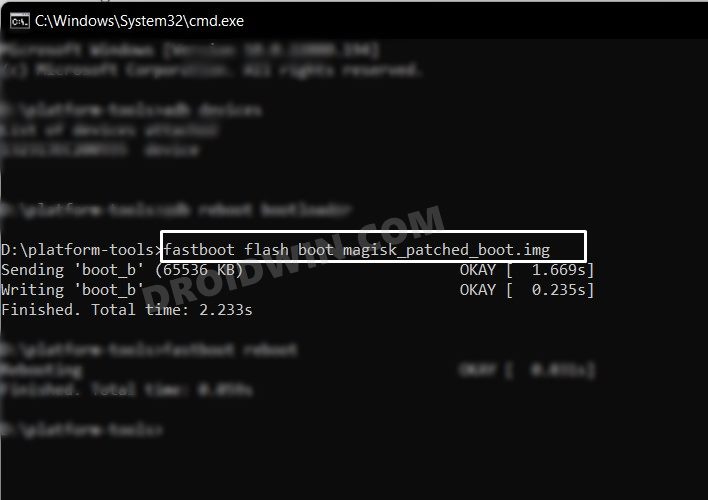
- How to Root Android 12 via Magisk patched boot.img
- How to Root Android 13 via Magisk Patched Boot
FIX 3: Use Shell Command First
You cannot execute the su command unless you have opened the shell environment beforehand. So make sure to do so using the instructions listed below
- To begin with, download and extract Android SDK Platform Tools on your PC.
- Then enable USB Debugging on your device and connect it to the PC via USB Cable.
- After that, head over to the platform-tools folder, type in CMD, and hit Enter.
- This will launch Command Prompt. Execute the below command in this CMD window: adb devices
- Now execute the below command to open the shell environment: adb shell
- You will now get a Magisk prompt on your device, tap Allow/Grant. Then execute the desired su command.
- That’s it. You would no longer get the “su is not recognized as an external or internal command” error.
FIX 4: Toggle Android Shell SuperUser Prompt
When you execute the su command, then your device invokes the Shell SuperUser permission. In some instances, it might fail to load or read an incorrect value. To rectify it, you will have to disable and then re-enable the Magisk permission set for SU. Doing so will refresh its underlying instance and would make it start off with a fresh instance from scratch. So let’s put this fix to the test and check out the results.
- Launch the Magisk app and go to the Modules section.
- Then disable the toggle next to [SharedUID] Shell, having the package name com.android.shell.
- Now execute the desired su command. You will get a prompt on your device, tap Allow.
- Likewise, the toggle next to Shell under Magisk should also have been enabled [if it hasn’t then you should manually do so].
- That’s it. You will now be able to execute the su command without any errors.
- Fix adb is not recognized as an internal or external command
- Magisk was denied SuperUser Rights: How to Fix
- Missed Magisk SuperUser Request: How to Grant Permission
- How to Pass SafetyNet on Rooted Android 12/Android 13

(Cancel Reply)
Δ
