Unbrick Nothing Phone 1: Flash Stock Firmware via Fastboot Commands
In this guide, we will show you the steps to unbrick your Nothing Phone 1 by flashing the stock firmware via Fastboot Commands. When it comes to hyping its product launches, then no one does it better than Carl Pei. We all witnessed the initial days of OnePlus when users eagerly waited for the invite-only sales. He has since carried forward the same legacy over to its own brand, and it seems to be doing wonders, at least during its initial days.
Another domain where it performs quite decently is custom development. The kernel source and device tree are already up and running for this device, just days after its launch. Along the same lines, you could also flash custom/GSI ROMs and gain administrative access by rooting your device via Magisk. this in turn will allow you to welcome a plethora of mods and tweaks onto your device.
However, this is just one side of the coin. Carrying out these tweaks could prove to be risky as well and there’s every chance of the device ending up in a bootloop or soft-bricked state. Well, even then you could easily unbrick your Nothing Phone 1 by flashing the stock firmware via Fastboot Commands. And in this guide, we will show you how to do just that. Follow along.
- METHOD 1: Unbrick Nothing Phone 1 by Flash Stock Firmware via Fastboot Commands STEP 1: Install Android SDK STEP 2: Download Nothing Phone 1 Firmware STEP 3: Extract Nothing Phone 1 Payload.bin STEP 4: Unlock Bootloader on Nothing Phone 1 STEP 5: Boot Bricked Nothing Phone 1 to Fastboot Mode STEP 6: Format Device via Fastboot METOD 1: Flash Nothing Phone 1 Firmware via Fastboot Commands
- METHOD 2: Unbrick Nothing Phone 1 using Fastboot and FastbootD Modes
- METHOD 3: Unbrick Nothing Phone 1 by Flashing Firmware to Both Partitions STEP 1: Set Partition A as Active & Boot to FastbootD STEP 2: Flash Nothing Phone 1 Firmware to Partition A STEP 3: Set Partition B as Active & Boot to FastbootD STEP 4: Flash Nothing Phone 1 Firmware to Partition B
- METHOD 4: Unbrick Nothing Phone 1 by Flashing Super.img
- FAQ: Flashing is not allowed for Critical Partitions
METHOD 1: Unbrick Nothing Phone 1 by Flash Stock Firmware via Fastboot Commands

The below process will wipe off all the data from your device. So take a complete device backup beforehand by any means possible. Droidwin and its members wouldn’t be held responsible in case of a thermonuclear war, your alarm doesn’t wake you up, or if anything happens to your device and data by performing the below steps.
STEP 1: Install Android SDK

First and foremost, you will have to install the Android SDK Platform Tools on your PC. This is the official ADB and Fastboot binary provided by Google and is the only recommended one. So download it and then extract it to any convenient location on your PC. Doing so will give you the platform-tools folder, which will be used throughout this guide to unbrick your Nothing Phone 1 via Fastboot commands.
STEP 2: Download Nothing Phone 1 Firmware
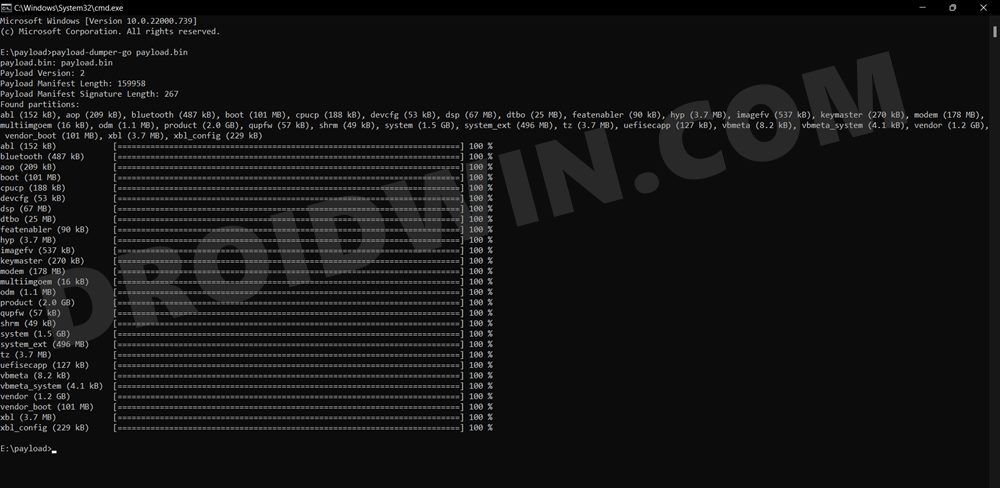
Next up, download the stock firmware for your device from the below link. Nothing provides its firmware in payload.bin, which you need to extract in order to get hold of the partition files. I have already done that for a few firmware versions. So if your device has the same firmware/build installed, then you could directly download the Fastboot ROM [extracted payload] instead of the payload.bin
NOTHING PHONE 1 FASTBOOT ROM
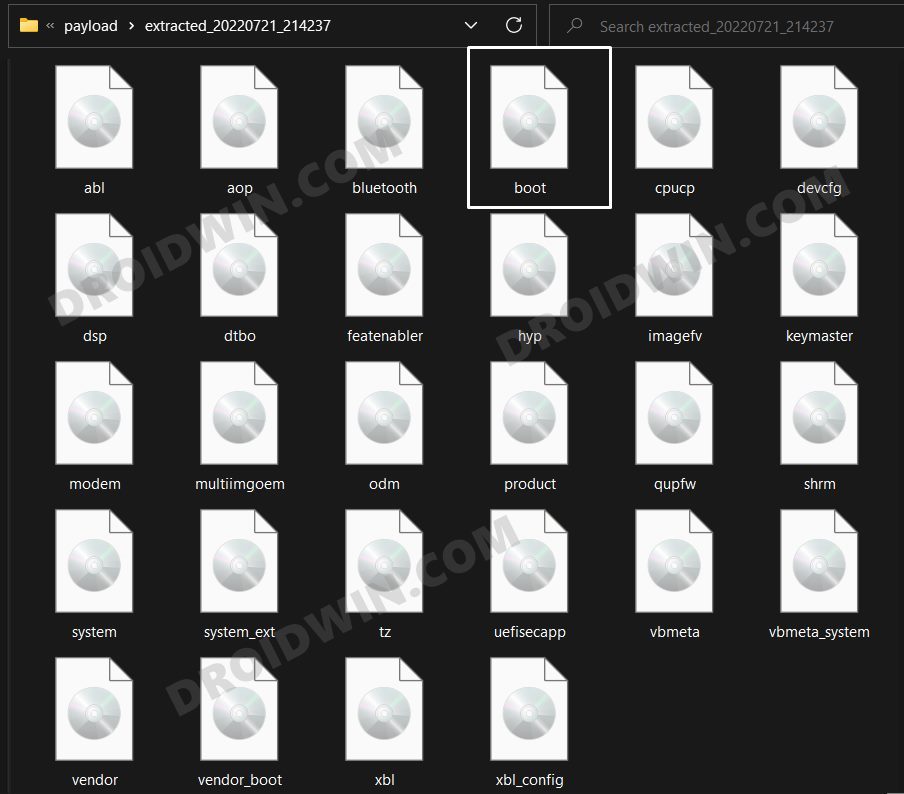
STEP 3: Extract Nothing Phone 1 Payload.bin
If you have downloaded the Fastboot ROM, then you could skip this step. On the other hand, if you have a payload.bin firmware, then you will have to extract it first and get the resultant IMG files. To do so, you may refer to our guide on How to Extract Payload.bin file. Once done, make sure to transfer all the extracted files to the platform-tools folder.
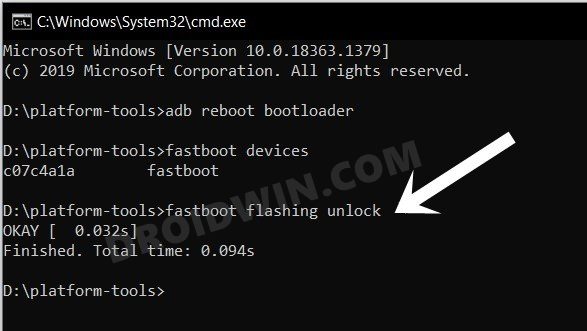
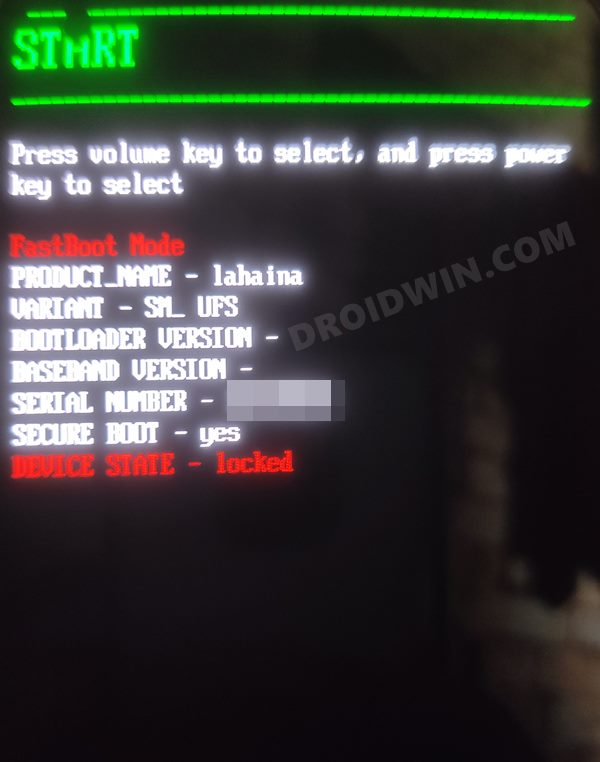
STEP 4: Unlock Bootloader on Nothing Phone 1
Since you are going through this unbrick guide, chances are you might have already unlocked the device’s bootloader. However, if you haven’t done so, then you may refer to our guide on Unlock Bootloader on Nothing Phone 1 [and its Critical Partition] . [Do note that for the unlocking process, you should have enabled OEM Unlock from the Settings menu beforehand. Moreover, you should also unlock the critical partitions as well].
STEP 5: Boot Bricked Nothing Phone 1 to Fastboot Mode
In most cases, a soft-bricked or boot-looped device might already be in the Fastboot Mode. However, if you are stuck in a bootloop, then long-press the Power key to turn it off. Then press and hold the Power and Volume Down keys (or Power and Volume Up in some devices) together to boot your device to Fastboot Mode.
However, if you are unable to power off the device, then let its battery drain out. Once that happens, connect it to the charger. Then as soon as it is about to boot up, use the Power and Volume Up/Down keys and it will straightaway boot to Fastboot Mode.
STEP 6: Format Device via Fastboot
- Head over to the platform-tools folder where the extracted ROM is present.
- Then go to its address bar, type in CMD in its address, and hit Enter. This will launch the CMD window.
- Now execute the below command to perform a factory reset (optional but recommended) fastboot -w
METOD 1: Flash Nothing Phone 1 Firmware via Fastboot Commands
- First off, make sure that you have checkmarked all the prerequisites from above [critical partitions should be unlocked as well].
- Then xecute the below commands in the CMD window [that is opened in the platform-tools folder] to flash the partition file.
- Make sure to execute one command at a time. Furthermore, if you get an error, then don’t leave the process mid-way, rather move over to the next flashing command.
fastboot flash abl abl.img

fastboot flash aop aop.img

fastboot flash bluetooth bluetooth.img

fastboot flash boot boot.img

fastboot flash cpucp cpucp.img

fastboot flash devcfg devcfg.img

fastboot flash dsp dsp.img

fastboot flash dtbo dtbo.img

fastboot flash featenabler featenabler.img

fastboot flash hyp hyp.img

fastboot flash imagefv imagefv.img

fastboot flash keymaster keymaster.img

fastboot flash mdtp mdtp.img

fastboot flash modem modem.img

fastboot flash multiimgoem multiimgoem.img

fastboot flash odm odm.img

fastboot flash product product.img

fastboot flash qweslicstore qweslicstore.img

fastboot flash qupfw qupfw.img

fastboot flash shrm shrm.img

fastboot flash super super.img

fastboot flash system system.img

fastboot flash system_ext system_ext.img

fastboot flash tz tz.img

fastboot flash uefisecapp uefisecapp.img

fastboot flash vbmeta vbmeta.img

fastboot flash vbmeta_system vbmeta_system.img

fastboot flash vendor vendor.img

fastboot flash vendor_boot vendor_boot.img

fastboot flash xbl xbl.img

fastboot flash xbl_config xbl_config.img
- Once the flashing is done, reboot your device to FastbootD Mode via the below command fastboot reboot fastboot
- Then once again flash all the files using the commands given above.
- Once done, perform a factory reset via the command listed below: fastboot -w
- Finally, use the below command to boot the device to the the OS: fastboot reboot
- If it ends up in stock recovery, then do a factory reset from the recovery.
- Once done, again try booting to the OS. Your nothing Phone 1 should now be unbricked.
METHOD 2: Unbrick Nothing Phone 1 using Fastboot and FastbootD Modes
In this method, we will be flashing the logical partition files to FastbootD Mode and the rest of the files to Fastboot Mode to unbrick your Nothing Phone 1. So start off by carrying out STEPS 1 to 6 listed in Method 1. Then with your device booted to Fastboot Mode, execute the below commands to flash the files to their respective partitions:
fastboot flash abl abl.img

fastboot flash aop aop.img

fastboot flash bluetooth bluetooth.img

fastboot flash boot boot.img

fastboot flash cpucp cpucp.img

fastboot flash devcfg devcfg.img

fastboot flash dsp dsp.img

fastboot flash dtbo dtbo.img

fastboot flash featenabler featenabler.img

fastboot flash hyp hyp.img

fastboot flash imagefv imagefv.img

fastboot flash keymaster keymaster.img

fastboot flash modem modem.img

fastboot flash multiimgoem multiimgoem.img

fastboot flash odm odm.img fastboot

fastboot flash qupfw qupfw.img

fastboot flash shrm shrm.img

fastboot flash tz tz.img

fastboot flash uefisecapp uefisecapp.img

fastboot flash vbmeta vbmeta.img

fastboot flash vbmeta_system vbmeta_system.img

fastboot flash vendor_boot vendor_boot.img

fastboot flash xbl xbl.img

fastboot flash xbl_config xbl_config.img
- After that, execute the below command to boot your device to FastbootD Mode: fastboot reboot fastboot
- Finally, flash the remaining files to their respective logical partitions in the FastbootD Mode fastboot flash product product.img fastboot flash system system.img fastboot flash system_ext system_ext.img fastboot flash vendor vendor.img
- Now use the below command to boot your device to the OS: fastboot reboot
METHOD 3: Unbrick Nothing Phone 1 by Flashing Firmware to Both Partitions
In this method, we will be flashing the firmware files to both the partitions [A&B] but in the FastbootD Mode. Follow along.
STEP 1: Set Partition A as Active & Boot to FastbootD
- Let’s assign Partition A as the active partition by executing the below command: fastboot set_active a
- After that, boot your device to FastbootD Mode by executing the below command: fastboot reboot fastboot
STEP 2: Flash Nothing Phone 1 Firmware to Partition A
Execute the below commands in the CMD window [that is opened in the platform-tools folder] to flash the partition file to the A Partition on your device. Make sure to execute one command at a time.
fastboot flash abl_a abl.img

fastboot flash aop_a aop.img

fastboot flash bluetooth_a bluetooth.img

fastboot flash boot_a boot.img

fastboot flash cpucp_a cpucp.img

fastboot flash devcfg_a devcfg.img

fastboot flash dsp_a dsp.img

fastboot flash dtbo_a dtbo.img

fastboot flash featenabler_a featenabler.img

fastboot flash hyp_a hyp.img

fastboot flash imagefv_a imagefv.img

fastboot flash keymaster_a keymaster.img

fastboot flash modem_a modem.img

fastboot flash multiimgoem_a multiimgoem.img

fastboot flash odm_a odm.img fastboot

fastboot flash product_a product.img

fastboot flash qupfw_a qupfw.img

fastboot flash shrm_a shrm.img

fastboot flash system_a system.img

fastboot flash system_ext_a system_ext.img

fastboot flash tz_a tz.img

fastboot flash uefisecapp_a uefisecapp.img

fastboot flash vbmeta_a vbmeta.img

fastboot flash vbmeta_system_a vbmeta_system.img

fastboot flash vendor_a vendor.img

fastboot flash vendor_boot_a vendor_boot.img

fastboot flash xbl_a xbl.img

fastboot flash xbl_config_a xbl_config.img
STEP 3: Set Partition B as Active & Boot to FastbootD
- It’s now time to set Partition B as the active one and then flash the firmware files.
- However, your device is currently booted to FastbootD Mode. So let’s first boot it back to Fastboot Mode via the below command: fastboot reboot bootloader
- Now, change your active partition to B by executing the below command: fastboot set_active b
- After that, boot your device to FastbootD Mode again by executing the below command [this is because the firmware files need to be flashed in FastbootD Mode]. fastboot reboot fastboot
STEP 4: Flash Nothing Phone 1 Firmware to Partition B
Execute the below commands in the CMD window [that is opened in the platform-tools folder] to flash the partition file to Partition B on your device. Make sure to execute one command at a time.
fastboot flash abl_b abl.img

fastboot flash aop_b aop.img

fastboot flash bluetooth_b bluetooth.img

fastboot flash boot_b boot.img

fastboot flash cpucp_b cpucp.img

fastboot flash devcfg_b devcfg.img

fastboot flash dsp_b dsp.img

fastboot flash dtbo_b dtbo.img

fastboot flash featenabler_b featenabler.img

fastboot flash hyp_b hyp.img

fastboot flash imagefv_b imagefv.img

fastboot flash keymaster_b keymaster.img

fastboot flash modem_b modem.img

fastboot flash multiimgoem_b multiimgoem.img

fastboot flash odm_b odm.img fastboot

fastboot flash product_b product.img

fastboot flash qupfw_b qupfw.img

fastboot flash shrm_b shrm.img

fastboot flash system_b system.img

fastboot flash system_ext_b system_ext.img

fastboot flash tz_b tz.img

fastboot flash uefisecapp_b uefisecapp.img

fastboot flash vbmeta_b vbmeta.img

fastboot flash vbmeta_system_b vbmeta_system.img

fastboot flash vendor_b vendor.img

fastboot flash vendor_boot_b vendor_boot.img

fastboot flash xbl_b xbl.img

fastboot flash xbl_config_b xbl_config.img
Now that we have flashed the partition files to both slots, it’s time to boot your device to the OS! So execute the below command for that:
fastboot reboot
METHOD 4: Unbrick Nothing Phone 1 by Flashing Super.img
For some users, simply flashing the stock super.img file did the work for them. In this regard, XDA Senior Member hofatheripper has shared the stock super.img which is based on EEA 1.1.3. So if your device has the same region, then you may download the file from below and subsequently flash it, using the below-given instructions
- Download the super partition file and extract it inside the platform-tools folder.
- Then rename it to super, so that the complete name becomes super.img
- After that, boot your device to Fastboot Mode via the below command adb reboot bootloader
- Finally, use the below command to flash the super file fastboot flash super super.img
- You may now reboot your device to the OS using the below command: fastboot reboot
- Unlock Bootloader on Nothing Phone 1 [and its Critical Partition]
- Nothing Phone 1: Download Stock Firmware | Fastboot ROM | Boot.img
- Root Nothing Phone 1 via Magisk Patched Boot.img
If you get the following error message “Flashing is not allowed for Critical Partitions”, then first off, take a note of the files that are giving out this error message. After that, flash those files in the FastbootD Mode . You may use the below command to boot your device to FastbootD from Fastboot. The flashing commands will be the same as listed above.
fastboot reboot fastboot
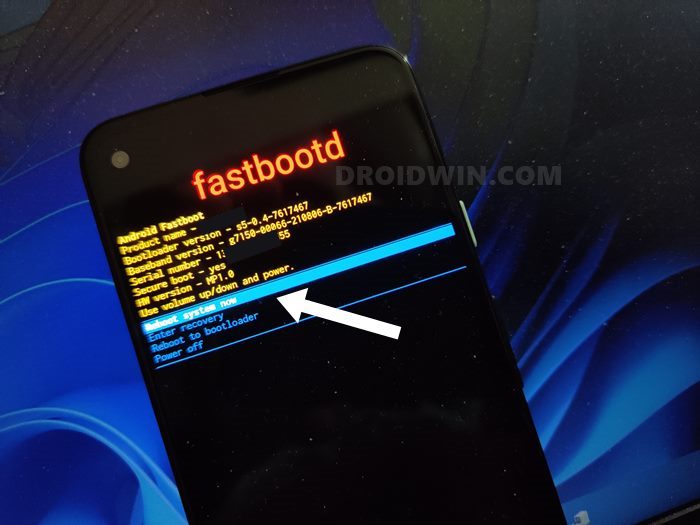
Reference Image

- ANIRWAN 2 years ago Reply Method 1 and 2 FAILED for me. Method 3 SUCCESSFULLY WORKED for me. I was having the same issue stating “Failed to boot into userspace fastboot; one or more components might be unbootable.” But as soon as I used the command to switch Partition to A, it worked.
- CC Wong 3 years ago Reply Hi, I followed your steps trying to do fastboot rom reinstallation after I “bricked” my phone (Nothing Phone 1) while trying to “relock bootloader”. At the steps of flashing files I encountered this C:\platform-tools>fastboot flash odm odm.img fastboot Sending ‘odm’ (1048 KB) OKAY [ 0.031s] Writing ‘odm’ FAILED (remote: ‘(odm_b) No such partition’) fastboot: error: Command failed The same error happened to product.img,system.img,system_ext.img and vendor.img… Hope you can point me to the right direction Thanks very much for your help Sadique Hassan 3 years ago Reply Please boot your device to Fastboot Mode via adb reboot bootloader and then to FastbootD Mode via fastboot reboot fastboot. Now try flashing those files [odm, product, system, system_ext, vendor, etc] in the FastbootD Mode that are giving the error. Alexander 3 years ago Reply Doesn’t work for me. If I try to boot into FastbootD mode, it says “Failed to boot into userspace fastboot; one or more components might be unbootable.”. I have the newest fastboot drivers installed. Sadique Hassan 3 years ago Reply Hi Alexander, missing ADB path seems to be one of the major reasons for the error. So if you are on a mac, then consider temporarily adding ADB to the path be executing the below command in the Mac Terminal, and let me know the results. export PATH=$PATH:absolute/path/to/program/ On the other hand, if you are on Windows, then please refer to this guide: How to Add ADB to Path in Windows 11 ccwong 3 years ago Reply Bumped into another error while trying to do as your said. ccwong@CCs-MacBook-Air ~ % fastboot reboot fastboot Rebooting into fastboot OKAY [ 0.002s] fastboot: error: Failed to boot into userspace fastboot; one or more components might be unbootable. ccwong@CCs-MacBook-Air ~ % Sadique Hassan 3 years ago Reply Hi ccwong, I did some research regarding Failed to boot into userspace fastboot and found out that the issue is mostly happening in the macOS. The workaround that fixed this issue for them involves adding the ADB to your path in Mac. You may try temporarily adding it to the path be executing the below command in the Mac Terminal and let me know the results. export PATH=$PATH:absolute/path/to/program/
- domo 4 years ago Reply I followed all steps and got an error of no such file or directory found. I had already done everything you posted but sadly my phone is still in bootloop at the moment. I even moved the folder into the same platform tools area again just to make sure. It’s still not working any ideas of what else I can do? Sadique Hassan 3 years ago Reply Hi Domo, could you let me know when you are getting this error? is it right after executing the first command itself?
- Mark 4 years ago Reply Hello, I am stucked with fastboot also. Tried this method and couldn’t get into fastbootd. I unrooted my phone then relocked the bootloader then got stucked with fastboot only. Sadique Hassan 3 years ago Reply Hi Mark, please install the Fastboot Drivers and then see if you are able to boot to the FastbootD Mode
(Cancel Reply)
Δ
