Unlock Bootloader, Flash Recovery, Custom ROM, Root via Termux
In this guide, we will show you a couple of handy methods using which you can unlock the bootloader flash Custom ROM and recovery, and root via Termux. Generally, you carry out all these tasks with the help of a PC. But there can be some instances wherein a PC might not be accessible, and you are in urgent need to carry out any of the aforementioned tweaks.
Well, in such cases, you can use the Termux-Root-Recovery-Tool, which allows you to carry out all these tasks via the Termux app installed on a secondary Android device, without any need for a PC whatsoever. Apart from that, you can also get this job done via the Command Line Tool named Termux ADB. So without any further ado, let’s have a look at both these tools, their features, and flashing instructions. Follow along.
- Unlock Bootloader, Flash Recovery, Custom ROM via Termux-Root-Recovery-Tool Features of Termux Root Recovery Tool How to Use Termux Root Recovery Tool
- Unlock Bootloader, Flash Recovery, Custom ROM via Termux-ADB Install Termux Packages How to Unlock Bootloader via Termux How to Flash a Custom Recovery using Termux How to Flash a Custom ROM using Termux How to Root using Termux
Unlock Bootloader, Flash Recovery, Custom ROM via Termux-Root-Recovery-Tool
Features of Termux Root Recovery Tool
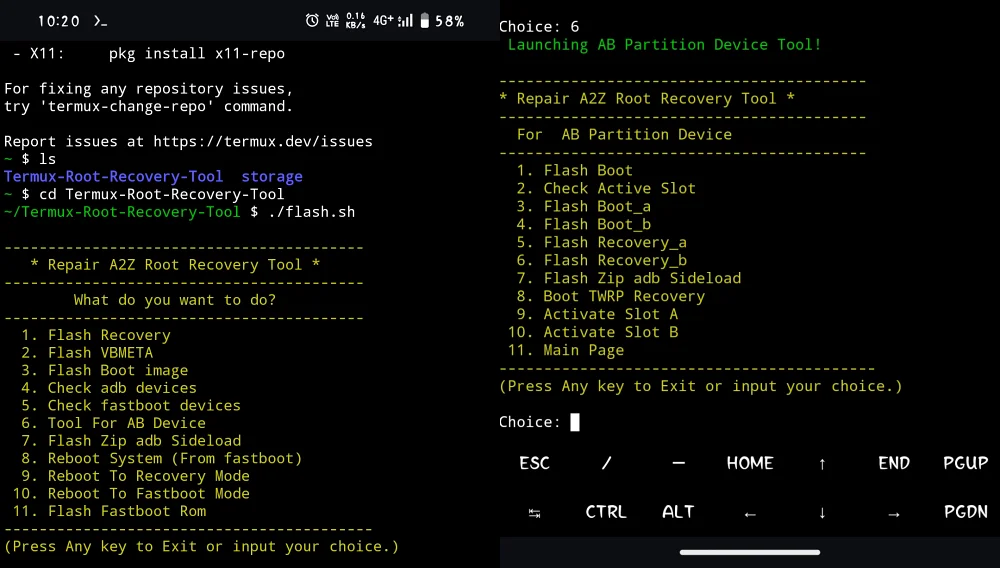
Let’s have a look at some of the noteworthy features of this tool:
- Flash Recovery: Flash a custom recovery like TWRP on your device.
- Flash vbmeta: Flash the vbmeta file to disable Android Verified Boot.
- Flash Boot Image: Flash Magisk Patched Boot.img to root your device.
- Check ADB Devices: Verify ADB Connection
- Check Fastboot Devices: Verify Fastboot Connection
- Tool for AB Device: Enter into the AB Partition menu of this Tool. Flash Boot: Flash Stock/Patched Boot Image file Check Active Slot: Check your current active slot, whether A or B. Flash Boot_a: Flash the stock/patch boot in Slot A. Flash Boot_b: Flash the stock/patch boot in Slot B. Flash ZIP ADB Sideload: Install a ROM ZIP file via ADB Sideload. Boot TWRP Recovery: Boot your device to TWRP Recovery Activate Slot A: Make Slot A your current active slot. Activate Slot B: Make Slot B your current active slot. Main Page: Go back to the main menu.
- Flash ZIP ADB Sideload: Install a ROM ZIP file via ADB Sideload.
- Reboot System (From Fastboot): Reboot to the OS from Fastboot.
- Reboot to Recovery Mode: Reboot to Recovery Mode [Stock/Custom]
- Reboot to Fastboot Mode: Reboot your device to Fastboot Mode.
- Flash Fastboot ROM: Flash the Fastboot ROM onto your device.
- Flash GSI ROM: Flash a Generic System Image onto your device.
How to Use Termux Root Recovery Tool

Now that you are aware of all the features of Termux-Root-Recovery-Tool, let’s make you aware of the steps to put this tool to the test. But before that, please take a complete device backup. Droidwin and its members wouldn’t be held responsible in case of a thermonuclear war, your alarm doesn’t wake you up, or if anything happens to your device and data by performing the below steps.
The primary device is the one on which the ROM, Recovery, etc, will be installed. Whereas, the secondary device is the one we will be carrying out the steps, such as installing Termux [this will act as our “PC”].
- To begin with, pick up a secondary Android device.
- Then connect that device to your primary device using an OTG.
- Now, install Termux and Termux API apps on your secondary device. You might have to turn off Play Protect before installing Termux API.
- Now launch Termux and execute the following four commands: SETUP TERMUX: yes | pkg update && upgrade termux-setup-storage pkg install termux-api yes | pkg install git INSTALL TERMUX-ROOT-RECOVERY-TOOL: git clone https://github.com/Ishu43642/Termux-Root-Recovery-Tool.git cd Termux-Root-Recovery-Tool chmod +x flash.sh && chmod +x flash-stock-rom.sh && chmod +x flashAB.sh && chmod +x gsi-flash.sh INSTALL ADB IN TERMUX: bash installadb.sh RUN TOOL: ./flash.sh
- As soon as the four commands are executed, the tool will open in Termux.
- You may now choose the desired option and get going!
- NOTE: The file that you want to flash should be on your secondary device.
- For instance, if you want to root your device: first reboot to Fastboot Mode [option 7 or via hardware key combinations] > then flash a custom recovery [option 1] > then reboot to recovery [option 9 via or hardware key combinations] > now flash the Magisk ZIP via the recovery > then boot to the OS.
Unlock Bootloader, Flash Recovery, Custom ROM via Termux-ADB
This is a command-line tool that allows you to execute ADB and Fastboot Commands in Termux. But, as opposed to the generic route, the ADB and Fastboot Commands syntax is slightly different in Termux. Over here, you will have to add ‘termux-‘ before the ‘adb’ and ‘fastboot’ keywords in all the Fastboot Commands.
For example, to boot the device to Fastboot, then instead of ‘adb reboot bootloader’, you’ll have to use ‘termux-adb reboot bootloader’. Likewise, if you want to check the Fastboot connection, then instead of the ‘fastboot devices’ command, you’ll have to use the ‘termux-fastboot devices’ command. So keep this point in mind before proceeding ahead.
The primary device is the one on which the ROM, Recovery, etc, will be installed. Whereas, the secondary device is the one we will be carrying out the steps, such as installing Termux [this will act as our “PC”].
Install Termux Packages
- Download and install Termux from F-Droid.
- Likewise, download and install Termux API . You might have to turn off Play Protect before installing Termux API.
- Now, launch Termux and install its API via: pkg install termux-api
- Next, install the GIT package via the command: pkg install git
- Now clone the Git repository via the command: git clone https://github.com/nohajc/termux-adb
- Then change the working directory to Termux ADB: cd termux-adb/
- Now install the script via the below command: ./install.sh
How to Unlock Bootloader via Termux
- Make sure that you have done the setup, as mentioned above.
- Then enable USB Debugging and OEM Unlocking on your secondary device.
- Now type in the below command in Termux Tool to boot the device to the Fastboot Mode. termux-adb reboot bootloader If it doesn’t work out, then you may use the hardware key combinations to boot to Fastboot Mode.
- Then type in the below command to unlock the bootloader: termux-fastboot flashing unlock
- You’ll now get a prompt, select Unlock the Bootloader via Volume keys and press the Power key to confirm.
- Your device will undergo a reset and the bootloader will be unlocked.
- Re-enable USB Debugging and move over to the next step now.
How to Flash a Custom Recovery using Termux
- Transfer the custom recovery to the secondary device’s Internal Storage. Likewise, rename it to twrp.img.
- On the other hand, transfer the ROM ZIP file to your primary device [the device where the ROM will be installed].
- Now type in the below command in Termux Tool to boot the device to the Fastboot Mode. termux-adb reboot bootloader If it doesn’t work out, then you may use the hardware key combinations to boot to Fastboot Mode.
- Then change the working directory to Internal Storage using the below command: cd /storage/emulated/0
- If you get the error message: Permission Denied, then first use this command: termux-setup-storage
- Then, once again,n try changing the directory via the below command, this time you will not get any issues: cd /storage/emulated/0
- Now, verify if your device has a recovery partition or not . If it has, then you can directly and permanently flash the recovery in the recovery partition. However, if it doesn’t, then we will be temporarily booting your device to recovery first and then making it permanent by flashing the ZIP/IMG or by using the Flash Current TWRP option from the Advanced menu. Here’s the command for both: termux-fastboot flash recovery twrp.img //permanently flash recovery termux-fastboot boot twrp.img //temporary boot to recovery. You may now make the recovery permanent [optional] as explained above.
How to Flash a Custom ROM using Termux

Without Super_Empty.img File
If your ROM doesn’t require wiping of the Super Partition via the super_empty.img file, then refer to the below steps, or else, check out the next section.
- Open Termux and type in the below command to boot your device to TWRP Recovery: termux-adb reboot recovery
- Once you are inside the recovery, flash the custom ROM according to its specific instructions.
- The generic route usually involves doing a Format Data > Flashing ROM ZIP > doing a Format Data > Rebooting to the OS/System.
Using Super_Empty.img File
Some Custom ROMs nowadays require you to wipe the Super Partition via the super_empty.img file. If your ROM belongs to that category, then the flashing steps are somewhat different, as outlined below:
- First off, download the super_empty.img file and transfer it to your secondary device.
- Then open Termux and type in the below command to boot your device to Fastboot Mode: termux-adb reboot bootloader
- Now type in the below command to wipe the Super partition via the super_empty.img file: fastboot wipe-super super_empty.img
- Once done, type in the below command to boot to the Fastboot Mode: termux-fastboot reboot recovery
- Now, flash the custom ROM according to its specific instructions.
- The generic route usually involves doing a Format Data > Flashing ROM ZIP > doing a Format Data > Rebooting to the OS/System.
How to Root using Termux
Using TWRP
- First off, download Magisk ZIP to your primary device.
- Then, install the TWRP Recovery, as explained above.
- After that, boot your device to the TWRP Recovery via: termux-adb reboot recovery
- Now, go to Install, select Magisk ZIP, and swipe to flash.
- Once done, go to Reboot > System to boot to rooted OS.
Using Magisk Patched Boot/Init_Boot
This will only work on devices whose firmware can be easily extracted on your device.
- Download and install Magisk on your primary device [i.e, the device which you want to root].
- Now download the same firmware that is on your device.
- You may verify the same from the Build Number section.
- Extract it, get the boot/init_boot.img, patch it via Magisk .
- If it is a ZIP/RAR file, then you could easily extract them via the default or third-party file manager app.
- On the other hand, if it is in payload.bin format, then refer to our guide on How to Extract payload.bin without PC [Video] .
- If your device came with Android 12 or an older version, then use boot.img. If it came with Android 13 or higher version, then use init_boot.
- Then transfer the patched boot/init_boot file to your secondary device and rename it to patched_boot.img/patched_init_boot.img.
- Now boot your device to Fastboot Mode, either via the below command or the hardware key combination: termux-adb reboot bootloader
- Now type in either of the two commands in Termux, depending on the file that you want to flash: termux-fastboot flash boot patched_boot.img termux-fastboot flash init_boot patched_init_boot.img
- Finally, type in the below command to boot the device to the rooted OS: termux-fastboot reboot
- How to Fix termux-setup-storage on Android
- Termux Not Working on Android 15 OnePlus/Realme/Oppo [Fixed]
- How to Access Internal Storage via cd command in Termux
- How to Enable Expressive Design in Android 16/15

(Cancel Reply)
Δ
