Users must enter a username and password Missing in User Accounts [Fix]
In this guide, we will show you the steps to bring back the missing ‘Users must enter a username and password’ option in User Accounts on Windows 11. Mnay users prefers to remove all the roadblocks during the initial boot up of their PC. In this regard they remove the login/sign in screen so that they could directly access the OS upon powering on the setup. In this regard, the first course of action is to remove all the PIN/Password/Facial Recognition/Fingerprint or any other form of security measure.
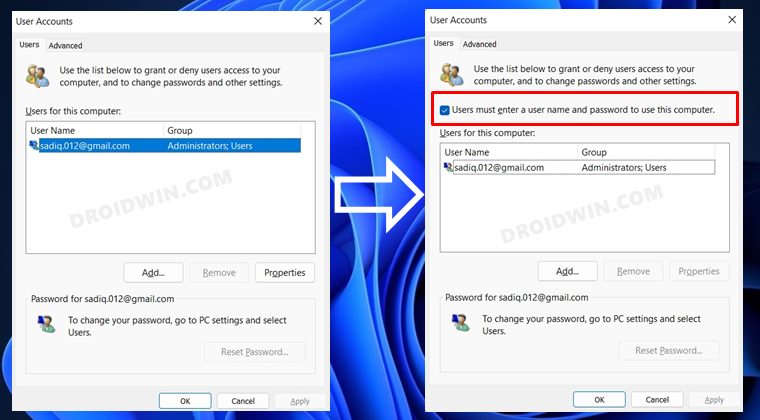
Once that is done, you will then have to deselct the ‘Users must enter a user name and password to use this computer’ option. However, many users have voiced thier concern that the said option is missing from their Windows 11 PC, for both the user as well as the admisntator account. If you are also currently bugged with this isuse, then this guide shall help you out. In this tutorial, we will show you a handy registry editor tweak that will bring back the missing ‘Users must enter a username and password’ option.
Fix ‘Users must enter a username and password’ Missing in User Accounts
- Launch Registry Editor from the Start Menu and head over to the below location Computer\HKEY_LOCAL_MACHINE\SOFTWARE\Microsoft\Windows NT\CurrentVersion\PasswordLess\Device
- Then open the DevicePasswordLessBuildViersion file from the right hand side.
- Now change its Value Data to 0 and hit OK to save it.
- Once done, open Run via Windows+R and type in the below command netplwiz
- That’s it. The missing option should now be present there.
- Show Hidden Icons missing in Windows 11 Insider Preview 22610.1 [Fixed]
- Print to PDF Option Missing in Windows 11: How to Fix
- [3 Methods] How to View Saved WiFi Passwords in Windows 11
- Print to PDF Option Missing in Windows 11: How to Fix

(Cancel Reply)
Δ
Print to PDF Option Missing in Windows 11: How to Fix
In this guide, we will show you various methods to fix the missing Print to PDF option on your Windows 11 PC. The ability to save the documents as a PDF file stands as one of the niftiest yet underrated features. Without taking the help of any third-party app, you could easily save any document file locally on your PC using the Print functionality. However, some users have voiced their concern that the said feature isn’t working along the expected lines.
For some, interacting with this option doesn’t save the file as a PDF whereas others have reported that the feature is missing altogether. If you are also in the same boat, then this guide will help you out. In this tutorial, we will show you various methods to fix the missing Print to PDF option on your Windows 11 PC. Follow along.
- Print to PDF Option Missing in Windows 11: How to Fix FIX 1: Re-Enable Print To PDF FIX 2: Manually Add Print to PDF FIX 3: Reinstall Printer Drivers Via Device Manager Via Powershell Via Command Prompt
Print to PDF Option Missing in Windows 11: How to Fix

It is recommended that you try out each of the below-mentioned workarounds and then see which one spells out success for you. So with that in mind, let’s get started.
FIX 1: Re-Enable Print To PDF
First and foremost, you should consider disabling and then re-enabling the said functionality. Doing so will refresh its underlying settings and could well resolve the underlying bug as well. So let’s put it to the test and check out the results.
- Bring up the Run dialog box via Windows R shortcut keys.
- Then type in the below keyword and hit Enter to open the Windows Features menu. optionalfeatures
- Now uncheck “Microsoft Print to PDF” and click OK.
- Then again open Windows Features, this time checkmark Microsoft Print to PDF and hit OK.
- Check if it fixes the missing Print to PDF option on your Windows 11 PC.
FIX 2: Manually Add Print to PDF
If the aforementioned method didn’t work out or if the said option was missing from Windows Feature, then you could also manually add it using the instructions given below.
- Bring up the Settings menu via Windows I shortcut keys.
- Then go to Bluetooth & devices > Printers & scanners.
- After that, click on the Add Device button followed by Add Manually.
- Now select Add a local printer or network printer with manual settings and click Next.
- Then choose File: (Print to File) next to “Use an existing port” and click Next.
- After that, select Microsoft under Manufacturer and Microsoft Print to PDF under Printers, and click Next.
- Now select “Current driver” and click Next. Then give it any name of your choice [optional] and hit OK.
- That’s it. This should fix the missing Print to PDF option on your Windows 11 PC.
FIX 3: Reinstall Printer Drivers
If the printer drivers get corrupted, then there are bound to be quite a few issues, including the ones that we are currently facing. To rectify it, you will have to reinstall these drivers, which could be carried out via three different methods. We have listed all of them below, you may refer to the one which is in sync with your requirement.
Via Device Manager
- Right-click on the Windows icon and select Device Manager.
- Then expand Print queues and right-click on Microsoft Print to PDF.
- After that, choose Uninstall device > Uninstall in the confirmation dialog box.
- Once that is done, restart your PC, Then launch Windows Features, checkmark Microsoft Print to PDF and click OK.
- This will reinstall the drivers. Once done, check if it fixes the missing Print to PDF option on your Windows 11 PC.
Via Powershell
- Launch Powershell as an administrator from the Start Menu
- Then execute the below command to disable Microsoft Print to PDF. Disable-WindowsOptionalFeature -online -FeatureName Printing-PrintToPDFServices-Features
- After that, execute the below command to re-enable Microsoft Print to PDF. Enable-WindowsOptionalFeature -online -FeatureName Printing-PrintToPDFServices-Features
- It will now be reinstalled. Check if it fixes the missing Print to PDF option on your Windows 11 PC.
Via Command Prompt
- To begin with, launch CMD as an administrator from the Start Menu.
- Then execute the below command to disable Microsoft Print to PDF. DISM /Online /Disable-Feature /FeatureName:“Printing-PrintToPDFServices-Features” /NoRestart
- After that, execute the below command to re-enable Microsoft Print to PDF. DISM /Online /Enable-Feature /FeatureName:“Printing-PrintToPDFServices-Features” /NoRestart
- Microsoft Print to PDF will now be reinstalled and this should rectify the underlying issue.
- Printer not working in Windows 11: How to Fix
- How to Change Default PDF App in Windows 11
- PDF Files Showing as Chrome HTML Files in Windows [Fixed]
- Fix Adobe Acrobat: PDF Pages Appearing with Yellow Background Color
(Cancel Reply)
Δ
